SaaD MaLiK

SaaD MaLiK
Showing posts with label Blogger. Show all posts

Saturday, 30 November 2013

How to Backup / Download and Restore Blogger Template

Every blogger should must Backup/Download their template before to do some changes in their template. Because sometimes we want to make changes in our blogger template but we forget to Backup our template, but if unfortunately those changes make some problem in our blog and if we do not know about that problem then that problem become a very difficult to us for solving. Therefore we should always Backup / Download our template before making some changes in template, because if we make a Backup / Download our template then if something will wrong in our template then we can restore our template by easily to bring your template to its undo/real form. So today for solving this problem, i will teach you about that how to make a Backup / Download your blogger template and restore your blogger template.

Now lets begin to know about this a great helpful trick,


How to Backup/Download your Blogger Template


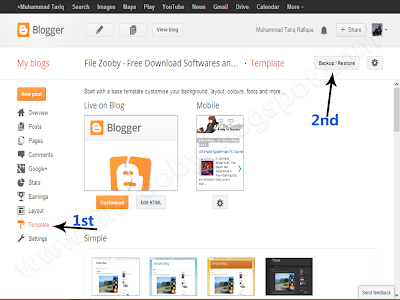
1.  Go to Blogger Dashboard >> Template >> Backup / Restore


2. Now click on "Download full template"


How to Restore your Blogger Template


1.  Go to Blogger Dashboard >> Template >> Backup / Restore


2. Now click on "Choose File" button and open your template that you want to restore.


3. After this press "Upload" button.


 Now you are done. If you like our tutorials then kindly like and subscribe us.

Tuesday, 26 November 2013

Remove Showing posts with label

Labels are more useful function to put and store your personal unique posts in by name or by work categories, so that a visitor can find his relevant area in your blog whatever he wants to find. But in every blogger template a dialogue named "Showing pots with label blogger tips. show all posts" will appear whenever someone click on any label link, thats make very confused every visitor and it is also look like a unprofessional blog. May be that could be a reason for losing your visitor from your blog. If you really want to remove this boring Dialogue then you will have to follow this procedure. Today i will tell you a very very easy Guide for removing that dialogue from your blog when someone click on your label.


Wanna remove this box

Let's follow the Guidelines


How to Remove "Showing pots with label blogger tipsshow all posts"


1. Go to Blogger Dashboard >> Template >> Edit HTML
2. Now search for this <b:includable id='status-message'> expand and mark the code that you want to remove like this


3. Now you will find the code look like below


<b:includable id='status-message'>
      <b:if cond='data:navMessage'>
      <div class='status-msg-wrap'>
        <div class='status-msg-body'>
          <data:navMessage/>
        </div>
        <div class='status-msg-border'>
          <div class='status-msg-bg'>
            <div class='status-msg-hidden'><data:navMessage/></div>
          </div>
        </div>
      </div>
      <div style='clear: both;'/>
      </b:if>
    </b:includable>

 4. And replace the above code with the below set of code

<b:includable id='status-message'>
<b:if cond='data:navMessage'>
<div>
</div>
<div style='clear: both;'/>
</b:if>
</b:includable> 

Finally you have a code like this without any boring dialogue


Now you are done, If you have done all those steps. Hope you will get all the procedure.

Top 10 SEO and Adsense Optimized Blogger Templates

Blogger Template gives your blog a new attractive design for attracting the visitors to your blog. So every blogger want to his blog more attractive than others, if such will happen then its confirm that the number of your blog's visitors will increasing. So today i have brought Top 10 SEO and Adsense ready Blogger Templates. These are all Professional Free Blogger templates that i am giving you so that you make your blog most beautiful and fast Loading and more reliable for the users, so that every user will connect with you for a long time. So the Deoms and Downlaod options are available below:

1. Fresh Life 2.0 Blogger Template


2. Daily 2.0 Blogger Template


3. Jarid Blogger Template


4. BS Xtreme Blogger Template


5. Word Plus Blogger Template


6. Elice Blogger Template


7. JP station Blogger Template


8. Metro Classic Blogger Template


9. Metro UI Blogger Template


10. Santro Blogger Template


If you like one of these Professional blogger Templates then like us and Subscribe us via Email Subscription.

Monday, 25 November 2013

How to Create and Start a Blog for Free

Blogger is a blog publishing service that allows you private or multi-user blogs with time-stamped entries. It was developed by Pyra Labs, which was bought by Google in 2003. Generally, the blogs are hosted by Google at a subdomain of blogspot.com. Now a days everyone want to earn money including those who used internet, because earn money from internet online is best method for earning without any physical working. Some of the people want to earn money without any effort but it is not possible for earning money.
So in Internet Globe world, if you want to earn money then you have to work hard to earn money, in the internet you can earn money with a lot of ways but in this Guide I will told you a best handsome and generous method for earning. Thus you have to create a blog and post there some unique posts that not already published in another website. If you really want to create a blog and earn money from it then you have to create a blog with unique contents. So let�s for creating a blog on blogger platform, follow this easy Guide,


How to Create a Blog on Blogger Hosting Platform?


1. Go to Blogger.com and enter your Gmail ID if you have not Gmail Account then click here to create

See Also:

2. After that press �New Blog� button for creating a new blog

Step 1

3. In title bar you have to write your blog�s Title whatever you want
4. And in Address bar you have to write your blog�s Address and select any template

Step 2

Step 3

See also:

Now you have created a new blog thus you have to customize your blog. If you do not know that how to customize then visit also: BloggerSEO Tips

Sunday, 24 November 2013

How to create a Gmail ID by easy and simple method with Images


Gmail is service given by Google.com, which is No.1 in the world. Gmail is email service that's intuitive, efficient, and useful. 15 GB of storage, less spam, and mobile access. So I recommend you to create this ID because it is the best service. With this service you can send and receive your important emails from all over the world without any doubt. Therefore in this post I want to tell you a method for creating Gmail ID. Now let�s start to create your favorite ID. Follow the instructions to create it,


How to create a Gmail ID by easy and simple method with Images?


1. Go to mail.google.com
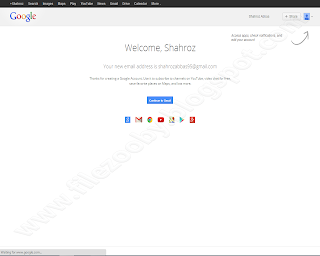
2. Click on �Create an account

Step 1

3. Now fill the blank form with your personal information (Note: See the picture to know that how to fill the form)

??
Step 2

Step 3
4. Then press �Next step
5. If you want to add your picture then click on �Add a photo� otherwise click on �Next step

Step 4

6. After that press �Continue to Gmail� button

Step 5

Finally you have create a fresh Gmail account. If you really like our tutorials then subscribe us and like us.

Friday, 22 November 2013

How to Change Facebook Login Background In Google Chrome

Facebook.com is a number one social media site that has a 2ndrank in the world after Google.com, now a days Facebook is rapidly running in the world internet globe. Every people like to use Facebook because Facebook is much popular in the world. So today we would learn a best method for �how to change Facebook login background in Google Chrome�. With this method you will be able to change your Facebook log in background style in your browser. Let�s start the to work,


1. Open your Google Chrome Browser
2. First Add Facebook background Changer to your browser by clicking the link below
3. A pop up Page open, now click on �+ Free� button after that Click on �Add� button and close it.

Now Facebook Log in Background has been set. If you want to change the background with your desire image then

4. Go to Settings >> Extensions >> Facebook Refresh Options >> image URL/Upload >> Choose file
5. And select your image which you want to show on Facebook Log in background.

Hope you got all the article and you would did it.

Friday, 15 November 2013

Add Contact Form to Blogger Pages

Every blogger want to make his/her blog is professional look, because if the blog gains a professional look then it will attract more visitors. So here Contact us form is valuable thing that make your page professional, like when someone want to contact you for its question or problem then he/she will contact you easily and he/she like your this easy service too.
Contact page is leading a very important role in the blog or website. Because with this every visitor can contact you with easily, Here contact us widget works very well, because only that is the widget with which every visitor can contact you easily.
So now let me tell you the whole procedure to add contact us form to your blogger pages, so that you could make your contact us page professional. See this very easy guide and follow it:


1. How to Add Contact Form Widget in blogger


i. Go to Blogger Dashboard >> Layout >> Add a Gadget
ii. Click on More Gadgets >> Contact Form       (Hint: On left upper side)

2. How to Hide Contact Form Widget from Blogger


You have to hide this widget because if you will not hide this widget then it show on that place where you have saved it e.g Right Slide Bar, on footer of your blog..

i. Go to Blogger Dashboard >> Template >> Edit HTML
ii. Then search for ]]></b:skin>
iii. Now Add the below code before ]]></b:skin>

#ContactForm1
{
display: none ! important;
}

 3. How to Add Contact Form in Blogger Pages


Now with this you can create Contact form in static page in blogger, where you wanna show your Contact form, so that a visitor can contact you by this form.

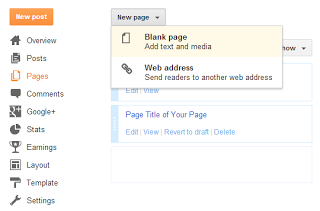
i. Go to Blogger Dashboard >> Pages >> New page >> Blank page


ii. Now Click on "HTML Tab"

iii. And paste the below set of code in the page

<div dir="ltr" style="text-align: left;" trbidi="on"><br /><style>#ContactForm1_contact-form-name{padding:5px;border:1px solid #dcdcdc;margin-bottom:20px;}#ContactForm1_contact-form-email{padding:5px;border:1px solid #dcdcdc;margin-bottom:20px;}#wccontactform{font:14px verdana;color:#222222;}#ContactForm1_contact-form-submit{margin-top:20px;background:#111111;;color:#ffffff;font:14px verdana;border:none;}.contact-form-email-message{padding:10px;max-width:350px;border:1px solid #dcdcdc;}</style> <br /><form id="wccontactform" name="contact-form"><input class="contact-form-name" id="ContactForm1_contact-form-name" name="name" size="30" type="text" value="Name" size="30" onblur='if (this.value == "") {this.value = "Name";}' onfocus='if (this.value == "Name") {this.value = "";}' /><br/><input class="contact-form-email" id="ContactForm1_contact-form-email" name="email" size="30" type="text" value="Email" size="30" onblur='if (this.value == "") {this.value = "Email";}' onfocus='if (this.value == "Email") {this.value = "";}' /><br/><textarea size="30" class="contact-form-email-message" id="ContactForm1_contact-form-email-message" name="email-message" rows="10" value="Message.." onblur='if (this.value == "") {this.value = "Message..";}' onfocus='if (this.value == "Message..") {this.value = "";}' ></textarea><br><input class="contact-form-button contact-form-button-submit" id="ContactForm1_contact-form-submit" type="button" value="Send" /><div style="max-width: 450px; text-align: center; width: 100%;"><div class="contact-form-error-message" id="ContactForm1_contact-form-error-message"></div><div class="contact-form-success-message" id="ContactForm1_contact-form-success-message"></div></div></form></div>

iv. And Set the page name as "Contact us" you can also set as your wish

Finally click on publish and you are done.
Saturday, 9 November 2013

Add Facebook Popup Like Box to Blogger Blog

Hi friends, Welcome back to Filezooby. In previous posts I told you about Facebook Simple and Floating like box, But this time I have brought a latest and great Facebook like box named as "Facebook Pop Up like box" which is worldwide famous and all's favourite. It is the best way ever to increase your Facebook likers. When any visitor will come to your blog it will appear first, and visitor surely click on this and with this your likes would be increased. Most of the blogger want to add this beautiful function to his/her blog or website, therefore I will tell you all procedure of adding this function to your blog or website. For adding this beautiful widget your blog then please follow these easy instructions to add it;


See the demo

How to Add Facebook Pop Up like box to Blogger Blog


i) Go to Blogger Dashboard> Layout> Add a Gadget
ii) Select "HTML/ JavaScript"
iii) Now Copy the below set of code and paste it in that HTML/ JavaScript Box with below changes.

<script src='https://ajax.googleapis.com/ajax/libs/jquery/1.6.1/jquery.min.js'></script><script src="https://facebookpopup2.googlecode.com/files/jquery.cbt-min.js"></script><script type="text/javascript">jQuery(document).ready(function(){if (document.cookie.indexOf('visited=true') == -1){var fifteenDays = 1000*60*60*24*29;var expires = new Date((new Date()).valueOf() + fifteenDays);document.cookie = "visited=true;expires=" + expires.toUTCString();$.colorbox({width:"399px", inline:true, href:"#exestylepopups"});}});</script><style type="text/css">#colorbox,#cboxOverlay,#cboxWrapper{position:absolute;top:0;left:0;z-index:9999;overflow:hidden}#cboxOverlay{position:fixed;width:99%;height:99%}#cboxMiddleLeft,#cboxBottomLeft{clear:left}#cboxContent{position:relative}#cboxLoadedContent{overflow:auto}#cboxTitle{margin:1}#cboxLoadingOverlay,#cboxLoadingGraphic{position:absolute;top:0;left:0;width:100%}#cboxPrevious,#cboxNext,#cboxClose,#cboxSlideshow{cursor:pointer}.cboxPhoto{float:left;margin:auto;border:1;display:block}.cboxIframe{width:99%;height:99%;display:block;border:1}#cboxOverlay{background:#001;opacity:0.5 !important}#colorbox{box-shadow:0 0 14px rgba(0,0,0,0.4);-moz-box-shadow:0 0 14px rgba(0,0,0,0.4);-webkit-box-shadow:0 0 14px rgba(0,0,0,0.4)}#cboxTopLeft{width:15px;height:15px;background:url(https://lh5.googleusercontent.com/-Oonf3hVB8Vk/UUVyfEEnnEI/AAAAAAAABBU/ymAdg3uHHkM/h120/controls.png) no-repeat 0 0}#cboxTopCenter{height:15px;background:url(http://goo.gl/O9QP9) repeat-x top left}#cboxTopRight{width:15px;height:15px;background:url(https://lh5.googleusercontent.com/-Oonf3hVB8Vk/UUVyfEEnnEI/AAAAAAAABBU/ymAdg3uHHkM/h120/controls.png) no-repeat -36px 0}#cboxBottomLeft{width:15px;height:44px;background:url(https://lh5.googleusercontent.com/-Oonf3hVB8Vk/UUVyfEEnnEI/AAAAAAAABBU/ymAdg3uHHkM/h120/controls.png) no-repeat 0 -32px}#cboxBottomCenter{height:44px;background:url(http://goo.gl/O9QP9) repeat-x bottom left}#cboxBottomRight{width:15px;height:44px;background:url(https://lh5.googleusercontent.com/-Oonf3hVB8Vk/UUVyfEEnnEI/AAAAAAAABBU/ymAdg3uHHkM/h120/controls.png) no-repeat -36px -32px}#cboxMiddleLeft{width:15px;background:url(https://lh5.googleusercontent.com/-Oonf3hVB8Vk/UUVyfEEnnEI/AAAAAAAABBU/ymAdg3uHHkM/h120/controls.png) repeat-y -175px 0}#cboxMiddleRight{width:15px;background:url(https://lh5.googleusercontent.com/-Oonf3hVB8Vk/UUVyfEEnnEI/AAAAAAAABBU/ymAdg3uHHkM/h120/controls.png) repeat-y -211px 0}#cboxContent{background:#ffe;overflow:visible}#cboxLoadedContent{margin-bottom:6px}#cboxLoadingOverlay{background:url(http://goo.gl/seJqH) no-repeat center center}#cboxLoadingGraphic{http://goo.gl/u3upJ) no-repeat center center}#cboxTitle{position:absolute;bottom:-24px;left:0;text-align:center;width:100%;font-weight:bold;color:#736f6f}#cboxCurrent{position:absolute;bottom:-24px;left:59px;font-weight:bold;color:#736f6f}#cboxPrevious,#cboxNext,#cboxClose,#cboxSlideshow{position:absolute;bottom:-28px;background:url(https://lh5.googleusercontent.com/-Oonf3hVB8Vk/UUVyfEEnnEI/AAAAAAAABBU/ymAdg3uHHkM/h120/controls.png) no-repeat 0px 0px;width:24px;height:24px;text-indent:-9999px}#cboxPrevious{left:0px;background-position:-50px -24px}#cboxPrevious.hover{background-position:-50px 0px}#cboxNext{left:27px;background-position:-74px -24px}#cboxNext.hover{background-position:-74px 0px}#cboxClose{right:0;background-position:-99px -24px}#cboxClose.hover{background-position:-99px 0px}.cboxSlideshow_on #cboxSlideshow{background-position:-124px 0px;right:26px}.cboxSlideshow_on #cboxSlideshow.hover{background-position:-150px 0px}.cboxSlideshow_off #cboxSlideshow{background-position:-149px -26px;right:26px}.cboxSlideshow_off #cboxSlideshow.hover{background-position:-124px 0px}#mdfb{font:12px/1.2 Arial,Helvetica,san-serif;color:#5c5757}#mdfb a,#mdfb a:hover,#mdfb a:visited{text-decoration:none}.mdbox-title{background:#000;color:#FFFEFE;font-size:21px !important;font-weight:bold;margin:9px 0;border:19px solid #ddd;-moz-border-radius:6px;-webkit-border-radius:6px;border-radius:6px;box-shadow:5px 5px 5px #CCC;padding:10px;line-height:24px;font-family:arial !important}</style><div style='display:none'><div id='exestylepopups' style='padding:10px; background:#ffff;'><center><h3 class="mdbox-title">Receive updates via Facebook. Click the Like Button Below...</h3></center><center><iframe src="//www.facebook.com/plugins/likebox.php?href=http%3A%2F%2Fwww.facebook.com%2FMuhammadTariqRafique&amp;width=299&amp;colorscheme=light&amp;show_faces=true&amp;border_color=%23ffffff&amp;stream=false&amp;header=false&amp;height=257" scrolling="no" frameborder="0" style="border:none; overflow:hidden; width:299px; height:257px;" allowtransparency="true"></iframe></center><p style=" float:right; margin-right:34px; font-size:10px;" > <a style=" font-size:10px; color:#397ad4; text-decoration:none;" href="
http://filezooby.blogspot.com/2013/11/facebook-popup.html">Get this widget</a></p></div></div>

1. Replace MuhammadTariqRafique with your Facebook page
2. If you want to appear widget on every reload of your blog visitor in all pages then, Just change true to false.
3. This widget will again Pop Up on your visitors desktop after 30 days, If he clears his browser cookies, If you want to minimize OR maximize time limit then just change *29 to your desire time. like 1 to 30 days
4. You can also change the Text in Blue text with you wish.

After this save it. You are done.

Hope you fully enjoyed this tutorial. If you like our tutorials then Subscribe us by enter your Email ID below Email Subscription box.


Add Facebook Floating Like Box on Mouse Hovering to Blogger Blog

Hello dear visitors, Today i am present to you in filezooby with a Beautiful Facebook floating like Box for blogger blog, Because this is the best and stylish widget ever, In previous post i told you about simple and clean Facebook like box for blog, But today i have brought a Floating Jquery Plugin Facebook like box for make your blog more beautiful and keep your eyes on your Facebook regularly fans. Floating Facebook like box is a beautiful mouse hovering box. Hope you must like this widget because this may be your favourite. Now you can see the demo image of Floating Facebook like box. If you really want to add this box to your blog then follow my instructions;


See the demo

First of all you have to Add Jquery Plugin to your Blog, See the instructions


How to add facebook Floating Like Box to Blogger in 2 Steps


Step 1

1. Go to Blogger Dashboard> Template> Edit HTML
2. Search for </head> tag in your template and just before it paste the below Jquery code (You can ignore this step if Jquery Link is already added in your template)


<script src='https://ajax.googleapis.com/ajax/libs/jquery/1.6.1/jquery.min.js' type='text/javascript'/>

Step 2

1. Go to Blogger Dashboard> Layout> Add a Gadget
2. Select HTML/ JavaScipt and paste the below set of code


<script type="text/javascript"> /*<![CDATA[*/ jQuery(document).ready(function() {jQuery(".abtlikebox").hover(function() {jQuery(this).stop().animate({right: "0"}, "medium");}, function() {jQuery(this).stop().animate({right: "-250"}, "medium");}, 500);}); /*]]>*/ </script> <style type="text/css"> .abtlikebox{background: url("https://blogger.googleusercontent.com/img/b/R29vZ2xl/AVvXsEhY0Dlm9wRE7hRk8i3aBtESG6OdGZs0pVwqDM4n8wvF3qqtJNsk9brqUw1uUebt5KmRBVcWpxG3Wc7zCaHX_MPOyRDfTATG9m9cN7Iy1O3qtXi4orSLLwkz3PjRmb8PQQI8sd0qnsXsrLw/s320/fb1-right.png") no-repeat scroll left center transparent !important; float: right;height: 270px;padding: 0 5px 0 46px;width: 245px;z-index:  99999;position:fixed;right:-250px;top:20%;} .abtlikebox div{ padding: 0; margin-right:-8px; border:4px solid  #3b5998; background:#fafafa;} .abtlikebox span{bottom: 4px;font: 8px "lucida grande",tahoma,verdana,arial,sans-serif;position: absolute;right: 6px;text-align: right;z-index: 99999;} .abtlikebox span a{color: gray;text-decoration:none;} .abtlikebox span a:hover{text-decoration:underline;} } </style> <div class="abtlikebox" style="">     <div>     <iframe src="http://www.facebook.com/plugins/likebox.php?href=https://www.facebook.com/MuhammadTariqRafique&amp;width=245&amp;colorscheme=light&amp;show_faces=true&amp;border_color=white&amp;connections=9&amp;stream=false&amp;header=false&amp;height=270" scrolling="no" frameborder="0" scrolling="no" style="border: white; overflow: hidden; height: 270px; width: 245px;background:#fafafa;"></iframe><span><a href="http://filezooby.blogspot.com/2013/11/facebook-floating.html"> Grab this widget</a></span>     </div> </div>

Now just replace https://www.facebook.com/MuhammadTariqRafique with your Facebook Fan page, and save it.

Hope you like our tutorials very much. If you want more tutorials then Subscribe us by entering your email ID.


Add Facebook Simple Like Box for Blogger

Facebook fan page is a latest method and a great way to promote your blog/website. Facebook like box also make your blog more beautiful and tell us how many Facebook regular fans on our blog. I am also using this Simple widget because with this widget your visitors easily like your blog by click on that facebook like button. Hope you like this widget too because some peoples like simple style like me. Facebook like box is widely used social plugin from Facebook developers, this Facebook like box will help your visitors to become regular reader just by clicking the like button. If want to add this button then you have to follow my simple procedure;


See the Demo


1. Go to Blogger Dashboard> Layout> Add a Gadget
2. Select HTML/JavaScript> Paste the below set of code


<iframe src="//www.facebook.com/plugins/likebox.php?href=https://www.facebook.com/MuhammadTariqRafique&width=292&height=258&colorscheme=light&show_faces=true&border_color&stream=false&header=false&" style="border:none; overflow:hidden; width:292px; height:258px;" ></iframe>

Just replace https://www.facebook.com/MuhammadTariqRafique with your Facebook Fan page and change 292 with your desire width and 258 with your desire height according to your desire template's width and height.

After that you have done it.


Friday, 1 November 2013

Change Post a Comment Style in Blogger Blog

Welcome again in Filezooby Blogger portion, I upload this post about Blogger knowledge after a while because i was updating other content on my site but today i am bringing a best and stylish post about "How to Change Blogger Post a Comment Message, Test and Style" in your blogger blog. Comments are the best way to increase the rank of your site or blog. If your comment box is more attractive then most of the visitors would like to comment in your blog. Therefor you have to add this beautiful feature to your blog, if you really want to increase the chances of visitors comments. See the method of adding this feature to your blog:


How to Change Blogger Post a Comment Style in blogger blog


1. Sign in to your Blogger Dashboard
2. Go to Template >Edit HTML
3. Search for this code <data:postCommentMsg/>         (Hint: Ctrl+F)

If you find this code then you definitly see the code like thas
<a expr:id='data:widget.instanceId + &quot;_comment-editor-toggle-link&quot;' href='javascript:void(0)'><data:postCommentMsg/></a>

If you find the above set of code then You will see another code like that
<h4 id='comment-post-message'><data:postCommentMsg/></h4>

Now you have to change the above Red Bold codes(<data:postCommentMsg/>) with the image style code that are situated below. See your favourite image styles;


Style 1


<img src="http://i.imgur.com/loIb9SE.jpg"/>


Style 2


<img src="http://i.imgur.com/9X1ysjr.gif"/>

Style 3


<img src="http://i.imgur.com/p12LRAd.jpg"/>

Style 4


<img src="http://i.imgur.com/BTy8X1x.jpg"/>

Style 5


<img src="http://i.imgur.com/kzoHRmC.jpg"/>

Style 6


<img src="http://i.imgur.com/nqFvW5T.jpg"/>

Style 7


<img src="http://i.imgur.com/uIt0VZh.png"/>

Style 8


<img src="http://i.imgur.com/WA7J1qE.jpg"/>

Style 9


<img src="http://i.imgur.com/GT9ZYrE.png"/>

Style 10


<img src="http://i.imgur.com/n9LtcSZ.png"/>


Hope you would get it and this post better helps you. If you like this then kindly share it.


Twitter Delicious Facebook Digg Stumbleupon Favorites More