

Every blogger want to make his/her blog is professional look, because if the blog gains a professional look then it will attract more visitors. So here Contact us form is valuable thing that make your page professional, like when someone want to contact you for its question or problem then he/she will contact you easily and he/she like your this easy service too.
Contact page is leading a very important role in the blog or website. Because with this every visitor can contact you with easily, Here contact us widget works very well, because only that is the widget with which every visitor can contact you easily.
So now let me tell you the whole procedure to add contact us form to your blogger pages, so that you could make your contact us page professional. See this very easy guide and follow it:1. How to Add Contact Form Widget in blogger
i. Go to Blogger Dashboard >> Layout >> Add a Gadget
ii. Click on More Gadgets >> Contact Form (Hint: On left upper side)
2. How to Hide Contact Form Widget from Blogger
You have to hide this widget because if you will not hide this widget then it show on that place where you have saved it e.g Right Slide Bar, on footer of your blog..
i. Go to Blogger Dashboard >> Template >> Edit HTML
ii. Then search for ]]></b:skin>
iii. Now Add the below code before ]]></b:skin>
#ContactForm1
{
display: none ! important;
}
3. How to Add Contact Form in Blogger Pages
Now with this you can create Contact form in static page in blogger, where you wanna show your Contact form, so that a visitor can contact you by this form.
i. Go to Blogger Dashboard >> Pages >> New page >> Blank page
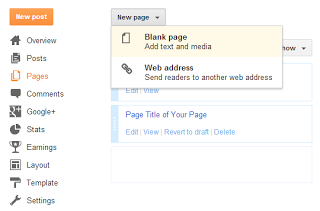
ii. Now Click on "HTML Tab"

iii. And paste the below set of code in the page
<div dir="ltr" style="text-align: left;" trbidi="on"><br /><style>#ContactForm1_contact-form-name{padding:5px;border:1px solid #dcdcdc;margin-bottom:20px;}#ContactForm1_contact-form-email{padding:5px;border:1px solid #dcdcdc;margin-bottom:20px;}#wccontactform{font:14px verdana;color:#222222;}#ContactForm1_contact-form-submit{margin-top:20px;background:#111111;;color:#ffffff;font:14px verdana;border:none;}.contact-form-email-message{padding:10px;max-width:350px;border:1px solid #dcdcdc;}</style> <br /><form id="wccontactform" name="contact-form"><input class="contact-form-name" id="ContactForm1_contact-form-name" name="name" size="30" type="text" value="Name" size="30" onblur='if (this.value == "") {this.value = "Name";}' onfocus='if (this.value == "Name") {this.value = "";}' /><br/><input class="contact-form-email" id="ContactForm1_contact-form-email" name="email" size="30" type="text" value="Email" size="30" onblur='if (this.value == "") {this.value = "Email";}' onfocus='if (this.value == "Email") {this.value = "";}' /><br/><textarea size="30" class="contact-form-email-message" id="ContactForm1_contact-form-email-message" name="email-message" rows="10" value="Message.." onblur='if (this.value == "") {this.value = "Message..";}' onfocus='if (this.value == "Message..") {this.value = "";}' ></textarea><br><input class="contact-form-button contact-form-button-submit" id="ContactForm1_contact-form-submit" type="button" value="Send" /><div style="max-width: 450px; text-align: center; width: 100%;"><div class="contact-form-error-message" id="ContactForm1_contact-form-error-message"></div><div class="contact-form-success-message" id="ContactForm1_contact-form-success-message"></div></div></form></div>
iv. And Set the page name as "Contact us" you can also set as your wish
Finally click on publish and you are done.


0 comments:
Post a Comment